Python for Power Systems

A blog for power systems engineers to learn Python.

How to Save Money With Your New Smart Meter

This is a simple story about how @haydarkie (the little guy) was able to notch up an incredible victory. He claimed his data back from the electricity companies. We’ll show you the steps he took to get his energy data and save big dollars on his energy bill.

These old style meters only report your electricity once in three months. Smart meters record monitor your electricity every half hour.

Do you have a smart meter?

Families commonly ask “How do I know if we have a smart meter?” The answer is that you are notified well in advance by your retailer that the installation will take place, and information will be left for you in your mailbox following the installation. Our story begins with the installation of a smart meter at the little guy’s family house.

Why is the data valuable?

Having worked in the industry, the little guy knew that the smart meter data was extremely valuable. With it he could shop around and get a better deal on his electricity – saving up to $100 / year on his bill. He can also see when he uses the most electricity, and whether or not it is during the most expensive part of the day, where customers are slugged double the price [1].

Here is how he got an Excel Spreadsheet of the valuable smart meter output emailed to him directly every quarter.

Contact his electricity company by email

Let them know you have a smart meter installed, you are a happy customer and would like to have regular access to your energy usage so you can save on your energy bill.

Here are the contact details of some of the retailers:

Bear in mind many retailers haven’t had a great deal of experience with smart meters yet, and may not have the systems in place to send you data in a timely manner.

Gently remind them of their obligations under the Retail Code

The little guy got pushback from his retailer who claimed there was no requirement to send data more than once per year. That was the old rule, now there is a new rule that says they must provide whenever you request it and no mention of payments being necessary. Be brave, ask for them to send your data every day. For them, sending it once a month (by comparison) is a good compromise.

What can you do with your data?
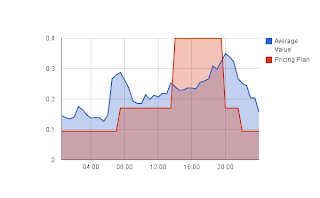
Do you use electricity during the most expensive part of the day?
[full size →]

Run a chart like the one here showing the ‘average value’ which is just your daily electricity use and your retailer’s time of use pricing plans in red. The huge jump in the red line is where you’ll pay the most to your electricity company.

Shop your data around, get together with 30 or so other little guys and form a cartel. You can shop the business of 30 people better than you can individually. This is what the big players like 7/11 and McDonalds do to save a fortune on their electricity costs.

Do you have any success stories about getting your data? Do you want to see your family or small business energy use on a chart like the one above? Leave a comment or email us directly at hello@whit.com.au.

[1] time of use pricing. Most of you won’t be on a time of use pricing plan yet because many retailers have been slow to introduce these plans. Your current plan is likely to be one where you pay a flat rate (say 21 cents / kWh) all day and all year round – even during winter when the market prices for electricity is low and your retailer makes a fortune from you.

With the time of use plans you pay 10 cents / kWh over night, 18 cents during most of the day and 40 cents in the afternoon. “Complicated?”, yes it is complicated, but you could save a lot of money every year if you avoid using electricity during the afternoon. The red line in the chart above shows the price difference throughout a day. I have heard that these plans are a year or two away and seasonal pricing may take even longer to introduce.

Silencing PSSE Output

Silence!

Thor 2011

PSSE prints a voluminous amount of information to the command line when you are running a program. Do you remember seeing this when you start PSSE up?

1
2
3
4
5
6
PSS«E Version 32
Copyright (c) 1976-2012
Siemens Energy, Inc.,
Power Technologies International (PTI)
This program is a confidential unpublished work created and first
licensed in 1976. It is a trade secret which is the property of PTI

We will show you a little function that you can use to selectively turn off this output (and other PSSE output) or redirect it to a log file.

This blog post is in response to a question by chip on the python for power systems engineers forum. Chip wanted to ignore some of the output that PSSE was printing without ignoring all of the program’s output.

silence.py
1
2
3
4
5
6
7
8
9
10
11
12
13
14
15
16
17
18
19
20
from __future__ import with_statement
from contextlib import contextmanager
import sys
import os

@contextmanager
def silence(file_object=None):
    """
    Discard stdout (i.e. write to null device) or
    optionally write to given file-like object.
    """
    if file_object is None:
        file_object = open(os.devnull, 'w')

    old_stdout = sys.stdout
    try:
        sys.stdout = file_object
        yield
    finally:
        sys.stdout = old_stdout

The function silence can be used to selectively turn off PSSE output printing in your program. Use it like this:

using silence
1
2
with silence():
  psspy.psseinit(10000)

Printing from within the context block (the with statement) will be ignored. (Note that we have initialised PSSE with buses set to ten thousand – based on our research of the optimal bus number).

What if you must redirect the PSSE output to a file? Got you covered. Use the silence function like this:

1
2
3
psse_log = open('psse_logfile.log', 'w')
with silence(psse_log):
  psspy.psseinit(10000)

There are more juicy details about how the context manager works on the forum: Silencing PSSE Stdout

edit: You must also redirect PSSE output to Python using the redirect module included with every PSSE installation:

1
2
3
4
5
6
import redirect
redirect.psse2py()

psse_log = open('psse_logfile.log', 'w')
with silence(psse_log):
  psspy.psseinit(10000)

How the Max Buses Setting Affects Your Code

..when you have eliminated the impossible, whatever remains, however improbable, must be the truth

Sherlock Holmes The Sign of the Four

This is a story about psspy.psseinit and how its buses argument is not so innocent and will one day commit a terrible crime on your study.

Have you ever sat and wondered why PSSE insists on asking for a buses argument when initialising? Did you notice that it isn’t optional? I’ve sat at my computer many times thinking: “Will I need 300, 1000 or 10,000 buses?”

What is the buses argument?

According to the API guide in section 12.13: The buses argument is the requested bus size. Not especially helpful, so in plain english we say the buses argument is:

buses - The maximum number of buses allowed in your study

Why have a maximum number?

PSSE was written in a time when creating a busmatrix in the computer’s memory was a difficult task. In those days, once you had picked a matrix size, thats was it, there was no second chance to resize it. So picking the maximum number of buses was very important. Choose a huge matrix and your poor computer’s memory would fill up, choose one too small then the matrix wouldn’t fit all of your buses.

PSSE uses more memory when you initialise more buses

We decided to put this to the test. The PSSE documentation states that the maximum number of buses it can handle is 150,000. So we initialised PSSE over and over and over with a maximum of 10 buses up to 1 million and measured how much memory it used.

The results are clear, allocating more maximum buses uses more memory until 150,000 when allocating more buses has no effect – because the additional buses beyond 150,000 are ignored.

The terrible crime and how to avoid it

Because of the history when PSSE was written, you must pick the correct size. If you pick a maximum number of 100 buses, and your raw file has 120 buses then 20 of those buses will not be loaded. Unlike for raw files, our experiments have shown that loading a saved case (.sav file) resets the maximum bus size to the one used in the sav case.

So some advice: be sure to set a maximum bus size large enough to handle your system size, but not too large otherwise PSSE will gobble up all of your memory. We suggest that 10,000 buses is enough, if you regularly use more than 10,000 buses let us know in the comments.

Find Your PSSE Path, Young Grasshopper

PSSE doesn’t make it easy to import and start using its Python API, psspy. We covered how and why it is beneficial to use Python to drive PSSE , but the implementation had a few limitations. To be specific, the necessary code to get it all working is a bit of black magic for the uninitiated and the PSSE install location is hard coded into the script. We discuss here a new method to get it to work on any setup with a single line of code. Best of all, it is free and and open source.

The following lines of code are the black magic which we aim to address:

1
2
3
4
import os, sys
sys.path.append(r"C:\Program Files\PTI\PSSE32\PSSBIN")
os.environ['PATH'] = (r"C:\Program Files\PTI\PSSE32\PSSBIN;"
                        + os.environ['PATH'])

The above code only works on systems where the PSSBIN folder is located at "C:\Program Files\PTI\PSSE32\PSSBIN". If you were to share this script with a colleague who was running on 64 bit install of windows ("C:\Program Files x86\PTI\PSSE32\PSSBIN") or a different version of PSSE ("C:\Program Files\PTI\PSSE33\PSSBIN"), then the script would fail to run.

pssepath solves this problem by automatically configuring these settings with a single line of code. The project is hosted on github and based on an idea proposed by chip in our Python for power systems engineers Q&A site (the answer that started it all). The goal is to be able to setup and import psspy on any computer with three simple lines of code:

1
import pssepath
1
2
pssepath.add_pssepath()
import psspy

Thats it! Now you can share your code with anyone and get back to doing productive work!

To use pssepath, download the zip from the pssepath download, extract the pssepath.py file and place it in the same folder as the script you want to run. We are working to make installation global (so you won’t have to place it in every folder) and much easier, so check back soon for developments.

The code is licensed to be compatible for use within a commercial environment. If you have any problems using pssepath, let us know about your difficulty and we will work with you to get it fixed for everyone. Alternatively, as the project is open source, you are free to take our code and do whatever you want with it (but if you do something really cool, please share it with the rest of us :)

Creating and Using Bus Subsystems


PSSE has two methods for retrieving information.
  1. A single element at a time; and
  2. A group of elements at once.
We believe that for most situations, gathering information about a group of elements at once is the right thing to do. However, collecting that information in PSSE is laborious, so we wrote a subsystem_info function and a blog post to make collecting information from a subsystem simpler.

Now we will take you though how to create a subsystem: a numbered collection of buses, zones or areas from which you can collect information using the subsystem_info function.

Subsystems are a group of buses and can be assigned an id from 0 to 11. Eleven is the highest available subsystem id because PSSE only allows you to have a maximum of 12 subsystems.

Subsystems from areas

Here is the hypothetical situation: Your PSSE saved case has already been set up with 3 areas (0, 1 and 2). We will create a new subsystem with id 0 that contains all the buses in those three areas.

psspy.bsys(sid=0, numarea=3, areas=[0, 1, 2])

You must remember to tell PSSE how many areas are in the list using the numarea = 3 keyword. The requirement to state the number of elements in the areas list is puzzling, because it can cause mistakes in your code if you forget to
change the numarea when you add extra areas.

# an error waiting to happen..
psspy.bsys(sid=0, numarea=3, areas=[0, 1, 2, 3])

Here is another example where we automatically calculate the number of areas:

areas = [0, 1, 2]
psspy.bsys(sid=0, numarea=len(areas), areas=areas)

Subsystems from a list of buses

Now we have a list of bus numbers and want to create another subsystem with id 1:

buses = [201, 202, 304, 305, 400]
psspy.bsys(sid=1, numbus=len(buses), busnum=buses)

Rather than being hard coded like this example, the buses variable could be read from a CSV file or a settings file.

Using the subsystem_info function


Finally, we will create a new subsystem and grab some information about buses in that subsystem using the subsystem_info function.

# first create the subsystem.
buses = [201, 202, 300, 304, 600]
psspy.bsys(sid=1, numbus=len(buses), busnum=buses)

# then collect bus number, name and voltage from the subsystem.
strings = ["NUMBER", "NAME", "KV"]
names_and_voltages = subsystem_info('bus', strings=strings, sid=1)

Ideas for further development

We have shown how to create a subsystem using the PSSE subsystem definition API, but the development shouldn’t stop there. In a future post we will propose an alternative subsystem API that will use named subsystems instead of numbered subsystem ids.

Reading and Writing CSV Files

Python provides an extensive suite of tools for interacting with CSV files. This article will discuss how to read and write CSV files when Python is calling the PSSE shots. For those unfamiliar with CSV files, each line is a record of information with the data within a record separated by a comma character.

CSV files can be used to store bus numbers along with their name and voltage to be read when ever necessary. Our example will focus on reading and writing a list of bus numbers and their corresponding name and voltage.

The following example will cover how to write out to a CSV file and then read the file back in.

First off, we need to import the csv module from the Python standard library:

1
import csv

Now we have access to the csv functionality. The most significant objects in this module are the csv.reader and csv.writer object. They do as their names suggest (read and write) very well.

Writing CSV

To write the data to file, we must open a file for writing, create a csv.writer object and pass it the file we wish it to write to.

1
2
3
4
5
# open a file for writing.
csv_out = open("mycsv.csv",'wb')

# create the csv writer object.
mywriter = csv.writer(csv_out)

The last call to csv.writer uses the default ‘excel’ dialect (more about dialect choices later).

1
2
3
4
5
6
7
8
9
10
11
12
13
14
15
16
17
18
19
import csv

bus_numbers = ['101', '102', '36', '40']
bus_names = ['NUC_A', 'NUC_B', 'CATDOG', 'HYDRO_A']
voltage = [.99, 1.02, 1.01, 1.00]

# open a file for writing.
csv_out = open('mycsv.csv', 'wb')

# create the csv writer object.
mywriter = csv.writer(csv_out)

# writerow - one row of data at a time.
for row in zip(bus_numbers, bus_names, voltage):
    mywriter.writerow(row)

# always make sure that you close the file.
# otherwise you might find that it is empty.
csv_out.close()

or alternatively:

1
2
3
4
5
6
7
8
9
10
11
12
13
14
15
16
17
18
19
import csv

bus_numbers = ['101', '102', '36', '40']
bus_names = ['NUC_A', 'NUC_B', 'CATDOG', 'HYDRO_A']
voltage = [.99, 1.02, 1.01, 1.00]

# open a file for writing.
csv_out = open('mycsv.csv', 'wb')

# create the csv writer object.
mywriter = csv.writer(csv_out)

# all rows at once.
rows = zip(bus_numbers, bus_names, voltage)
mywriter.writerows(rows)

# always make sure that you close the file.
# otherwise you might find that it is empty.
csv_out.close()

The difference is on lines 13 to 15. The for loop has been replaced with a single call to writerows.

Reading CSV

Reader objects are defined in the same way as the writer objects: using an open file object.

1
2
csv_in = open('mycsv.csv', 'rb')
myreader = csv.reader(csv_in)

We can then loop over the reader object to process one row at a time:

1
2
3
4
5
6
7
8
9
10
# Create the lists to store the columns.
bus_id = []
bus_names = []
voltage = []

for row in myreader:
    id, name, volt = row
    bus_id.append(id)
    bus_names.append(name)
    voltage.append(float(volt))

Notice that volt is converted to a float before it is appended to the list. All variables read in from a CSV file are read in as strings and must be manually converted to the appropriate type before use. The other two fields, id and name, were not converted because later they will be used as strings.

A more compact way of achieving the same result:

1
2
3
4
5
csv_in = open('mycsv.csv','rb')
myreader = csv.reader(csv_in)

bus_id, bus_name, voltage = zip(*myreader)
voltage = map(float, voltage)

The zip(* ) call above does some magic to transpose a list of rows into a list of columns. The map call applies the function passed in as the first argument to every item in the list passed in as the second argument and returns a new list of converted items. This completes the data type conversion from a string to floats.

Dialects

Because CSV is not a standardised format there are always small, incompatible changes between CSV files from different vendors. Fortunately, Python acknowledges this and handles these cases with a minimum of fuss by specifying the changes when creating the reading and writing objects. For instance, the following writer object will use a tab character \t, instead of a comma, to separate the data within a row.

1
mywriter = csv.writer(csv_out, delimiter='\t')

Several format options can be set at a time by listing them all in the initial definition of the object. A list of all modifiable properties can be found on the Python Standard Library website for the csv module. A complete group of these properties is called a dialect. The default dialect is the ‘excel’ dialect and represents the CSV format Excel uses to export its spreadsheets.

If you regularly need to specify many of these properties, it may be worthwhile defining a new dialect and using that to initialise the writer object. This process is covered on the csv entry on the Python Standard Library website.

Do You Want Files With That? Pop Up Dialog to Ask for PSSE Saved File

Pop up box ask for filename

Today we’ll write an example Python function to ask for filenames. You can use this function in your Python code to ask for saved case names or for output CSV file names.

Asking your users for the name of a saved case file using a pop up box is a nice touch. Though it isn’t the only way to to get filenames. Sometimes people hard code filenames into the Python script itself:

topsecret.py
1
2
3
4
if __name__ == "__main__":

    psspy.psseinit(8000)
    psspy.case(""c:/darryn/cases/2001 East Stages v43.sav"")

Here “Darryn” has put the saved case name at the very bottom of the file. Anyone wanting to run the code on another year’s case or with a different file version would need to read through the code and find this line to change it.

Another better strategy is to move the filename into its own variable near the top of the Python script or in a separate file called settings.py where all configurable aspects of your script should be collected:

topsecret.py
1
2
3
4
5
6
7
8
import psspy

#--------------------------
# Constants

SAVED_CASE = "c:/darryn/cases/2001 East Stages v43.sav"

#--------------------------

This is better, at least now the configurable portions of our program are in a predictable location for our colleagues to find. But we can do better, lets write a function to pop up a box asking the user which file they want to open.

Our pop up box will have a title, “Please select a saved case” and a file type filter: “Select a .sav file”.

1
2
3
4
5
6
7
8
9
10
11
12
13
14
15
16
17
18
19
20
21
22
23
24
25
26
27
28
29
30
31
32
33
34
35
36
37
38
39
40
41
42
43
44
45
46
47
48
49
50
51
52
53
54
from tkFileDialog import askopenfilename, asksaveasfilename
import Tkinter
import tkFileDialog

#------------------------------------------------------------
# Exceptions

class NoFilenameSelected(Exception):
    """User didn't select a filename."""

#------------------------------------------------------------

def ask_for_filename(title=None, initialdir=None,
                                                filetypes=None, saveas=False):
    """
    Pop up a dialog box asking the user to select a file, 
    Returns the path of the file selected.

    Args:
      saveas - If True, use a save as dialog box and allow the user to select
               a file that does not yet exist. Otherwise the filename must
               already exist.
    raises:
        NoFilenameSelected - If the user presses cancel or 'X' quit on the
            dialog box.
    """
    if title is None: title = "Please select a file"
    if initialdir is None: initialdir = "."
    if filetypes is None: filetypes = [('all files', '*.*')]

    # hide the default root Tkinter window.
    root = Tkinter.Tk()
    root.withdraw()

    if saveas:
        askfunction = tkFileDialog.asksaveasfilename
    else:
        askfunction = tkFileDialog.askopenfilename

    fname = askfunction(title=title, initialdir=initialdir, filetypes=filetypes)
    if not fname:
        raise NoFilenameSelected(
                "User did not select a filename for '%s'" % title)
    return fname

#------------------------------------------------------------

if __name__ == "__main__":

    fname = ask_for_filename(
            title="Hi there",
            filetypes=[("pdf files", ".pdf")],
            saveas=True)
    print fname

Here are some examples using the new function:

1
2
3
4
5
6
7
8
9
10
11
# Only allow selecting .sav files.
>>> ask_for_filename(
 "Please select a PSSE Saved case",
  filetypes=[("Saved Case", ".sav")])
"C:/darryn/cases/2001 Eastern States High Demand case v43.sav"

>>> # Allow .csv and .txt files
>>> ask_for_filename(
 "Please select the output results file",
 filetypes=[("CSV", ".csv"), ("Text", ".txt")],
 saveas=True)

Next time you need to ask for a filename why not use the ask_for_filename function? It’ll pop up and brighten your day.

Restructuring PSSE Scripts: A Simple Tutorial

I came across this PSSE python script recently and thought it would serve as a good example to show how simply restructuring the code will make it more readable.

Writing readable code is important, especially if you plan to share your script with someone in another department or organisation. The person you share with can understand and use your code quickly, they may even further improve your code by adding new features. Conversely a difficult to read script is a chore to work with. Potential bugs are difficult to spot and you may miss the meaning of the code.

Can you work out the purpose of the script? What about the major steps it takes? Are the generators added as in-service or out of service generators? Are there any exceptions to this rule? My apologies for the line width of this original file, it won’t fit into many of your browsers. You can download the original file using the “view raw” link at the bottom of the Gist.

The revised version is a quick attempt at applying some of the following principals to code restructuring:

PEP8 Coding style

We use Python Enhancement Proposal 8 (PEP8) compliant coding techniques for an instant readability boost. Most Python developers write code that adheres to PEP8’s guidelines. Following it yourself will ensure that your code will look more like Python code, and can be picked up by someone else familiar with PEP8.

Accurate Comments

Should be used to document difficult parts of the code. Be careful not to confuse complex code with bad code that should be rewritten. If a section of code requires an inordinate amount of comments to explain how it works, perhaps that section could be rewritten in a simpler manner.

Make sure comments are updated along with any code that is being rewritten. It saves everyone time when the comments match what the code is doing. It is better to have no comments than it is to have incorrect comments.

Magic Number Removal

Numbers that are written throughout the code without any meaning attached. They are confusing to colleagues because it is not immediately obvious to a new reader of the code why the magic number exists. The original code had a significant number of magic numbers, we removed some of them but many remain.

Smaller Functions

We tried to identify common tasks and move that code into its own function. Smaller functions are often easier to understand and test and can be documented as completing one specific task. Here are some warning signs that your function is too long and needs to be split up into smaller functions:

  • Many levels of indentation; and
  • Your function is longer than 200 lines of code.

The new script also boasts status logging to file and we have turned on PSSE exceptions. We will explain why turning on PSSE exceptions is a good idea in future post. Please spend some time comparing both of the files, we’d love to hear if you think we could improve on our readability and why.

Turn Back Time Using Python and PSSE

Roads? Where we’re going, we don’t need roads.

Doc Back to the Future II

I have a recurring problem, I spend time carefully adding a new load or generation to my case only to have it blow up when I try to solve. It turns out I wasn’t so careful and didn’t check that the voltage levels were similar or my new bus’ voltage angle was set to the default 0 degrees and the connecting bus was 15 degrees.

There are a lot of reasons why adding new equipment to an existing PSSE case or creating a new switching configuration might fail. If we are lucky, our script stops and we can fix the problem, though I have seen some scripts that keep marching on getting nonsense answers right until the end.

I’d like to take you through a new model for altering a PSSE saved case in your Python scripts that will allow to you literally* turn back time when the case blows up and continue with the program.

  • disclaimer: not literally, I don’t have a flux capacitor.

Ok give me two examples so I know what you are talking about

I have a list of 30 network augmentations that need to be made. Each is a proposed new generating asset or replacement of existing plant. I want to try to add all of them to my saved case, and write in a log file the ones that failed. I’ll manually apply those failed ones later – or reject their connection application (hehe).

Another example is writing my own QV curve generator, I want to add a ficticious generating plant, and play with the Q output and voltage set point to measure the system response. Afterwards I want to remove the ficticious plant without having completely ruined the integrity of my case forever. It is well known that PSSE can be a difficult master to re-tune after we do something stupid like add a synchronous condensor and set the voltage set point to 1.1 per unit and re-solve allowing tap stepping.

So how would I benefit by turning back time in those cases?

OK with our 30 augmentations, say there was one dud with data that was subtly insane. So when we add that dud case, PSSE blows up! Start again? No we don’t need to, just turn back time to the last good augmentation and continue with the rest.

The QV curve benefits are quite obvious, and can be translated to many activities outside of QV curve generation. Imagine if it was an every-day simple task to turn back time and get back your last known good solved case I’d pay good money for that, and I know you would too. Instead though read on and you can write your own time-machine for free.

Some theory about database transactions

This entire method of turning back time to the last known good system state was inspired by database theory of all things. Databases have something called a “transaction” which essentially means:

Either everything works according to plan, or we rollback and nothing gets done at all

There is no half-way, either it all works, or we use a giant undo button that removes the series of steps that led to failure. Of course, PSSE has no undo button, but together you and I will build one soon enough, keep reading.

This translates to the PSSE world in the following way:

  • We group a series of instructions like the ones required to add a new generator into a single function.
  • That function is run inside a transaction
  • We attempt to solve at the end or during the transaction
  • We write a check to see if the transaction was successful (e.g. no blow up, voltages healthy etc.)
  • If successful we continue (and laugh quietly at our success)
  • If not successful, we log our failure, rollback our changes and move on (still laughing quietly)

Enough, show me the code

Ok, here it is I have called the function transaction. But you can call it something fancy like de_lorean or time_machine.

Here is a short example in the wild

The example is quite minimal. We create a function which adds a generator and expect that one to succeed. However the second function which changes the swing bus to a type 2, we expect that to fail.

Have a play around with the example as a starting point and see what else you can get the transaction to do.

Designing an Easier PSSE Subsystem Data Retrieval API

I want to take you through a small function that we have written that will combine the entire PSSE subsystem data retrieval API into a single, easier to use function.

What does the original subsystem data retrieval api look like?

Have you ever looked at the PSSE subsystem data retrieval API (Chapter 8 in the PSSE API guide)? With it you can get information about branches and buses (and other elements like machines) for an entire subsystem. So how would we go about getting a list of all of the bus numbers in subsystem 2?

1
ierr, busnumbers = psspy.abusint(sid=2, string="NUMBER")

Things become tricky when we want the bus names and the bus numbers though.

1
2
ierr, busnumbers = psspy.abusint(sid=2, string="NUMBER")
ierr, busnames = psspy.abuschar(sid=2, string="NAME")

We had to know that the NAME attribute uses a different API call to the NUMBER attribute. If we wanted to get the bus per unit voltage we would need another API call again, and if we wanted the total in service fixed bus shunt in MW and MVar a fourth API call would be required.

four function calls is three too many
1
2
3
4
ierr, busnumbers = psspy.abusint(sid=2, string="NUMBER")
ierr, busnames = psspy.abuschar(sid=2, string="NAME")
ierr, busvoltages = psspy.abusreal(sid=2, string="PU")
ierr, bus_shunts = psspy.abuscplx(sid=2, string="SHUNTACT")

Each of the return values from the API is a nested list. If you wanted to get the name and pu voltage for bus number 340:

getting name and pu voltage for bus number 340
1
2
3
bus_index = busnumbers[0].index(340)
voltage = busvoltages[0][bus_index]
name = busnames[0][bus_index]

The resulting code can be extremely difficult to read, and quite verbose.

A wrapper around the old API

Using the new subsystem_info function is easy. Lets get the bus numbers, names, pu voltages and actual shunt values for subsystem id 2:

1
2
3
4
5
>>> businfo = subsystem_info('bus', ['NUMBER', 'NAME', 'PU', 'SHUNTACT'], sid=2)
>>> print businfo
[(205, 'CATDOG', 1.01, complex(0.4, 0)),
 (203, 'CATDOG2', 0.99, complex(0, 0)),
 ... ]

All of the information we were looking for is organised neatly into rows, rather than separate columns. Here is how we made that function.

How does this work?

The new function relies on some helpful design choices in the original PSSE subsystem data retrieval api.

Each of the functions are named using a regular pattern:

1
2
3
4
abusint,
abuscplx,
amachint,
aloadint

a element type api data type

a bus int

There is a lookup function called abustypes (we’ll call it types) which will return a character string that represents each of the api data types. For example

1
2
>>> psspy.abustypes("NUMBER")
"I"

We ask the types function about each of the attributes the user has requested. So a query like ["NUMBER", "NAME", "PU"] might return ["I", "R", "C"], being int, real and char respectively.

Use a dictionary to store functions

Ok, so we can find a character "I", "R", "C" that represents the API type. Translating that character into the correct retrieval function to use is the clever part.

There is a Python dictionary to look up the corresponding API call for the attribute requested. So asking for "NUMBER" which returns "I" from the types function will retrieve the psspy.abusint function from the dictionary. Using a dictionary to look up a function like this is called the ‘dispatch table pattern’ (example 4.16 in the Python Cookbook if you have a copy)

Grouping related calls to the API together

The difficult part is grouping and returning the API calls in rows and in the order they were requested. The itertools groupby function is used to group related API calls together so if we requested ["NUMBER", "TYPE", "NAME"] we might get ["I", "I", "C"] from abustypes.

The groupby will group the two consecutive “I” api calls together so we can make one function call:

1
abusint(string=["NUMBER", "TYPE"])

instead of two function calls:

1
2
abusint(string="NUMBER") # and
abusint(string="TYPE")

Transpose columns to rows

Finally, we use the built in zip function to transpose a list of columns into a list of rows

1
2
>>> zip(*[[1,2,3], [4,5,6]])
[(1,4), (2, 5), (3,6)]